

How to make the perfect cloth fermentation covers!
Disclosure: I am an Amazon affiliate and this post contains affiliate links, which means I may earn a commission (at no extra cost to you) if you purchase products mentioned.
If you’ve ever fermented food at home, it’s likely you’ve come across this in the directions: “Now take a coffee filter or tightly-woven cloth and secure it around the jar with a rubber band.” Whether it’s kombucha, water kefir, or another fermented beverage, this is usually the instruction. And this is what I did for a while, until my sewing skills improved and I figured out the perfect and cutest hack!

Stay tuned, because I am going to show you how to make the perfect cloth fermentation covers. All you need is a sewing machine with a straight stitch, elastic and normal thread, plus the fabric of your choosing.
Cutting your fabric
Ideally, you want to use a cotton fabric. This is because the whole purpose of covering your ferment with a cloth is to let it breathe and interact with all the yeasts and bacteria in its environment (i.e. your kitchen!).
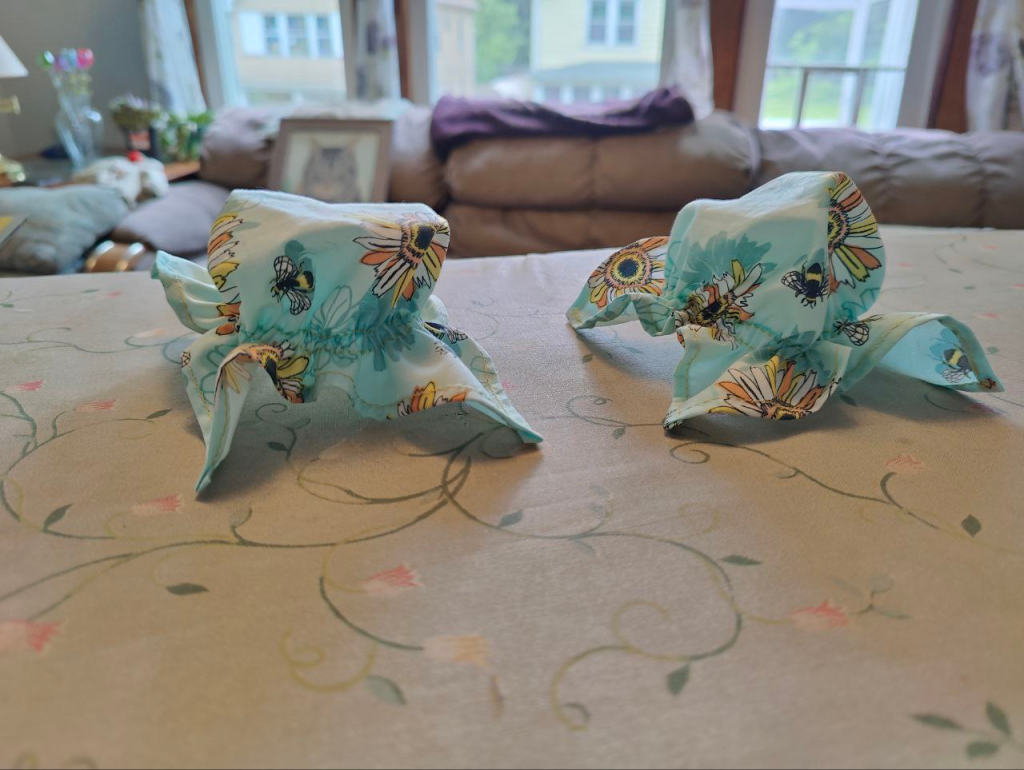
What size you cut the fabric depends on the size of the jar’s mouth. For a wide mouth mason jar, a 10″x10″ square should be more than enough. You can go bigger, too, if you want more excess fabric hanging off the edges! Remember, part of the appeal of doing this is they just look so cute! So, by all means, do whatever makes it visually appealing to you. (For the fabric pictured, I actually used 8″x8″. I think this is the smallest you could get away with for a wide-mouth jar!)
I love using my sewing ruler to mark fabric for cutting.

Finishing the edges
The reason I cut a square (despite the jar’s mouth being circular) is because this is a much easier shape to hem. However, if you have a serger, a zigzag stitch, or another overlocking stitch on your sewing machine, you could cut a circular shape instead and just finish the edges that way.
Personally, I love using my vintage Singer Featherweight sewing machine, so I hem the edges. This can be done by simply folding the edges over themselves twice. You can iron the hem before sewing if you really feel like it, but usually finger-pressing as you go is more than enough for these little fermentation cloth covers.

Once you’ve hemmed or finished all four edges, you’re ready for the next step!

Sewing the elastic
This step is so much fun! Though it does take a little bit of familiarity with a sewing technique called shirring. This is the same technique which produces stretchy and form-fitting gathers in clothes, as you can see in this shirt:

You’ll need to set up your sewing machine with an elastic thread in the bobbin and a normal thread (of aesthetic color choice) on top. It is important that the bobbin tension is enough that the elastic doesn’t just pull out, but not too much that you have to pull really hard to get it to pull out.
Elastic thread at the store can be a bit pricey for just a little spool. I bought these online and haven’t even come close to running out for all my shirring projects!
To prepare for sewing the elastic, mark a circle with chalk or a fabric marker on the right side of the fabric. For a wide mouth mason jar, my circle had a diameter of six inches. It doesn’t need to be exact. Just add a couple of inches to the diameter of your jar’s mouth.

Now you’re going to sew along this circle on the right side of the fabric, so the elastic doesn’t show on top. Make two passes about a quarter inch apart. As you sew, if your bobbin tension is correctly configured, the elastic thread on the bottom with start to scrunch the fabric that has gone through the machine. As you make the second pass, you’ll need to hold it taut and keep it flat.


Check out the finished result! So cute! It sort of reminds me of a little bonnet for a baby.
Now, just to use it!
As you can see, these really don’t take a lot of time to make, and the finished result is so cute! Using cute fabric really adds a nice effect, too. This is one of the many ways I love to beautify my kitchen and add a girly touch. And they’re totally functional! Compared to the rubber band and cloth method, they are much easier to place and remove.

Make sure that when you wash yours, you don’t use high heat, because the elastic can lose its stretch. I honestly like to just suds them up in the kitchen sink, rinse them, and let them air dry when they need a clean (which isn’t too often!).
I hope you liked this tutorial on how to make your own cloth fermentation covers! If you have any questions about the process, please comment below and I will get back to you ASAP! Thanks for being here!


One Comment